Why Water is the #1 Enemy of Every Retaining Wall
Installing retaining wall drainage is the single most critical step to prevent wall failure, yet it’s often overlooked or improperly executed. Without proper drainage, water pressure builds up behind your wall, leading to cracking, leaning, and eventual collapse—potentially costing thousands in repairs or complete reconstruction.
Key steps for installing retaining wall drainage:
- Excavate a trench at least 12 inches wider than the wall and 6 inches deeper for the leveling pad
- Install a 4-inch perforated drain pipe at the base, with holes facing down and a 1% minimum slope
- Backfill with drainage aggregate (¾” clean crushed stone) in 6-inch lifts, compacting each layer
- Wrap the drainage zone with geotextile fabric to prevent soil from clogging the system
- Install weep holes every 6-10 feet along the bottom course for additional pressure relief
- Grade surface water away from the top of the wall to prevent saturation
The science behind drainage failure is straightforward: soil absorbs and holds water, especially after heavy rain. When water has nowhere to escape, it creates hydrostatic pressure—the force of accumulated water pushing against your wall. This pressure can reach thousands of pounds per square foot, far exceeding what most walls are designed to withstand.
In San Diego’s clay-heavy soils, this problem intensifies. Clay retains water like a sponge, generating even more pressure. Add in the weight of saturated soil (which can double compared to dry soil), and you have a recipe for structural failure.
Poor drainage doesn’t just threaten your wall—it can undermine the entire foundation through soil erosion, create dangerous sinkholes, and in freeze-prone microclimates, cause blocks to crack and crumble through repeated freeze-thaw cycles.
The good news? Proper drainage installation prevents all of these issues and extends your retaining wall’s lifespan from a few years to several decades. The investment in doing it right the first time is a fraction of the cost of premature failure.

Why Drainage is the Unsung Hero of Retaining Walls
Behind every durable retaining wall, the true hero is the drainage system. Water is the single biggest threat to a wall’s stability, as saturated soil becomes heavy and exerts immense hydrostatic pressure. Effective water management for retaining walls is not just an add-on; it’s the foundation of a long-lasting structure.
The Dangers of Hydrostatic Pressure
When water has no escape route, the resulting pressure can cause your wall to:
- Bulge or lean: The most common signs of structural distress.
- Crack: Mortar joints split and blocks fracture, compromising the wall’s integrity.
- Fail catastrophically: In severe cases, the wall can collapse, posing a safety risk and causing extensive property damage.
Preventing Erosion and Foundation Damage
Poor drainage also leads to erosion. Uncontrolled water will wash away soil from behind and beneath your wall, creating voids that can cause:
- Soil washout and loss of backfill.
- Undermining of the wall’s foundation.
- Uneven settling and cracking.
- Sinkholes in extreme cases.
Mitigating Freeze-Thaw Damage
Even in San Diego’s temperate climate, some microclimates experience freezing temperatures. Trapped water expands when it freezes, exerting enough force to crack blocks, cause surface flaking (spalling), and heave the foundation. Proper drainage removes this excess moisture, protecting the wall from the damaging cycle of freezing and thawing. Our expert team understands these risks and designs solutions that account for all environmental factors. More info about custom retaining wall solutions
The Anatomy of a Retaining Wall Drainage System
A robust retaining wall drainage system is a layered defense designed to collect, channel, and redirect water away from the wall. Understanding each component is key to a successful installation.

Drainage Aggregate (Gravel Backfill)
This is the porous heart of the system, creating a permeable zone behind the wall for water to filter through.
- Material: Use ¾” clean crushed stone. Its angular shape interlocks for stability while allowing water to pass. Avoid sand or native soil, which retain water.
- Zone: The backfill zone should be at least 12 inches wide behind the wall.
Perforated Drain Pipe (Footing Drain)
This pipe is the system’s main artery, collecting and carrying water away.
- Type: A 4-inch diameter pipe (PVC or corrugated HDPE) is standard.
- Placement: It sits at the lowest point behind the wall, with the perforation holes facing down to allow water to enter from below.
- Outlet: The pipe must slope towards a “daylighted” outlet, directing water to a safe location away from the wall. Outlets should be protected from debris and pests.
Geotextile Filter Fabric
This fabric acts as a barrier, separating the drainage aggregate from the surrounding soil.
- Function: It prevents fine soil particles from clogging the gravel and the drain pipe, ensuring the system works long-term.
- Application: The non-woven fabric should line the entire drainage zone and can also be used as a “sock” around the perforated pipe for extra protection.
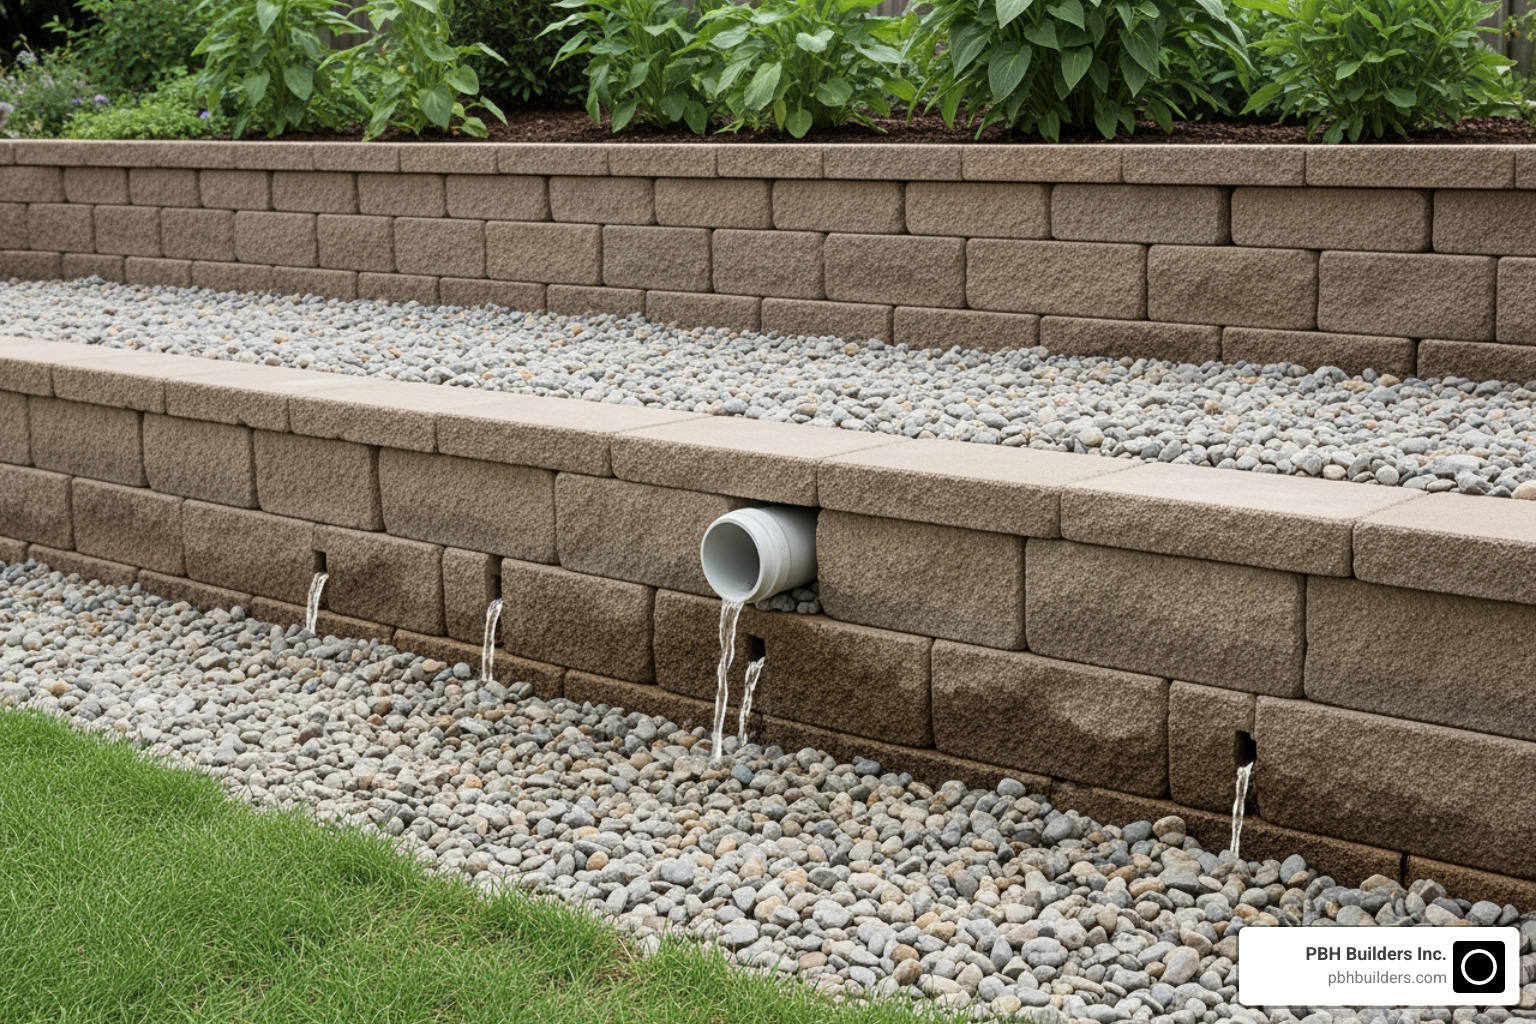
Weep Holes
These small openings in the wall’s base provide an additional pressure relief valve.
- Purpose: They allow trapped water to escape directly through the face of the wall.
- Placement: Weep holes are typically installed in the bottom course of the wall, spaced every 6-10 feet.
When properly integrated, these components form a resilient system that protects your retaining wall from water damage. Learn about our retaining wall installation services
A Step-by-Step Guide to Installing Retaining Wall Drainage
Installing retaining wall drainage correctly is a meticulous process that ensures the structure’s stability. Here’s how our team approaches it:

Step 1: Site Preparation and Excavation
A proper foundation is critical for both the wall and its drainage.
- Excavate: Dig a trench at least 12 inches wider than the wall blocks and deep enough for a 6-inch compacted base. This creates the necessary space for the drainage zone.
- Prepare Leveling Pad: Install and compact a 6-inch layer of aggregate base. This pad must be perfectly level and extend at least 6 inches in front of and behind the first course of blocks.
Step 2: Installing the Drain Pipe
The drain pipe is the core of the system, collecting and removing water.
- Placement: Lay a 4-inch perforated pipe at the lowest point of the drainage zone, with the holes facing down.
- Slope: Ensure the pipe has a minimum 1% slope to a “daylighted” outlet or storm drain connection. This allows gravity to drain water away effectively.
- Outlet Protection: Secure the outlet with a rodent screen to prevent clogs from debris or animals.
Step 3: Adding Backfill and Filter Fabric
This step creates the permeable zone and protects it from contamination.
- Lay Fabric: Line the excavated area behind the wall with non-woven geotextile filter fabric to separate the drainage stone from the native soil.
- Backfill in Lifts: Add ¾” clean crushed stone in 6-inch layers (lifts), compacting each one.
- Encase the Zone: Once backfilled, fold the filter fabric over the top of the stone to completely enclose the drainage zone.
Step 4: Managing Surface Water
Effective drainage isn’t just about what’s behind the wall; it’s also about controlling water around it.
- Grading: The final grade of the topsoil must slope away from both the top and bottom of the wall to prevent water from pooling.
- Diversion: Use swales to divert runoff from slopes above the wall. Ensure roof downspouts and irrigation systems are directed away from the wall to prevent saturation. More info on driveway retaining walls
Frequently Asked Questions About Retaining Wall Drainage
Why is drainage essential for retaining walls?
Drainage is critical because it relieves hydrostatic pressure—the force of water-saturated soil pushing against the wall. Without it, walls can bulge, crack, or collapse. This is especially important in areas with clay soil, like San Diego.
What are the primary functions of a retaining wall drainage system?
A drainage system’s main jobs are to:
- Relieve Hydrostatic Pressure: Prevent water from building up behind the wall.
- Prevent Erosion: Stop water from washing away the soil that supports the wall’s foundation.
- Mitigate Freeze-Thaw Damage: Remove moisture that could freeze, expand, and crack the wall.
- Extend Wall Lifespan: Ensure the wall remains stable and functional for decades.
What are the key components of a retaining wall drainage system?
A complete system includes:
- Drainage Aggregate: A layer of clean, crushed stone (e.g., ¾” gravel) behind the wall.
- Geotextile Filter Fabric: A barrier that stops soil from clogging the aggregate.
- Perforated Drain Pipe: A pipe at the base that collects and carries water away.
- Weep Holes: Small openings in the wall face for additional pressure relief.
- Proper Grading: Sloping the ground to direct surface water away from the wall.
How does soil type affect drainage needs?
- Clay soils hold water and create high pressure, requiring a robust drainage system with ample gravel and filter fabric.
- Sandy soils drain well but still need a system to control water flow and prevent sand from clogging the drain pipe.
- Organic soils are unsuitable for backfill and must be replaced with proper structural fill.
What are the best practices for installing drain pipes?
- Place a 4-inch perforated pipe at the lowest point behind the wall.
- Ensure the pipe’s holes face down to collect water efficiently.
- Create a minimum 1% slope so water flows out by gravity.
- Connect the pipe to a daylighted outlet away from the wall.
- Protect the outlet with a screen to prevent clogs.
How do freeze-thaw cycles impact retaining walls?
When trapped water freezes, it expands with immense force, which can crack blocks, cause surface flaking (spalling), and heave the wall’s foundation. Proper drainage removes this water, minimizing the risk of freeze-thaw damage, even in San Diego’s milder microclimates.
What are common mistakes to avoid when installing drainage?
Common errors include using the wrong backfill (like soil or sand), forgetting the filter fabric, installing the drain pipe incorrectly (no slope or holes facing up), allowing the outlet to become blocked, and ignoring surface water management. For more guidance, see these Tips for Adding Drainage To Your Retaining Wall.
How does wall height influence drainage requirements?
The taller the wall, the greater the pressure it must handle. Walls over 4 feet tall almost always require an engineered design, which includes a more robust drainage strategy, often with larger drainage zones or multiple pipes.
What are the differences between toe drains and heel drains?
- A toe drain is the standard pipe located at the base (toe) of the wall, directly behind the blocks.
- A heel drain is a secondary pipe placed further back, at the rear (heel) of the reinforced soil zone. It’s used on taller, engineered walls to intercept groundwater before it reaches the wall. You can see examples of these advanced components in professional wall drain systems.
When is a drain pipe absolutely necessary?
A drain pipe is essential for nearly all retaining walls, especially those over 2-4 feet tall, built in clay soils, supporting a slope or driveway, or located in areas with high rainfall.
How does proper drainage extend the lifespan of a retaining wall?
By eliminating the primary cause of failure—hydrostatic pressure—a proper drainage system prevents cracking, leaning, and collapse. It protects the foundation from erosion and preserves the wall materials, ensuring your investment lasts for decades instead of just a few years.
Ensure Your Wall Lasts a Lifetime with Professional Installation
Installing retaining wall drainage is not merely an add-on; it’s an indispensable component for the longevity and safety of your retaining wall. From mitigating the crushing force of hydrostatic pressure to preventing erosion, freeze-thaw damage, and unsightly deterioration, a well-designed and expertly installed drainage system is the difference between a wall that stands strong for decades and one that fails prematurely.
We understand that while the principles are clear, the execution requires precision, knowledge of local San Diego soil conditions, and adherence to best practices. Getting it right the first time is significantly more cost-effective and less stressful than dealing with the aftermath of a failed wall.
At PBH Builders Inc., we pride ourselves on creating captivating, harmonious outdoor environments that are not only beautiful but also built to last. Our expertise in landscape design and hardscaping means we carefully plan every detail, including robust drainage solutions custom to your specific property and local conditions. We serve San Diego, Chula Vista, Oceanside, Escondido, Carlsbad, Vista, San Marcos, Encinitas, La Mesa, Santee, National City, Poway, Imperial Beach, and Coronado, ensuring your investment in a retaining wall is a sound one.
Don’t leave the stability of your landscape to chance. Trust our team to provide a strong, lasting structure that improves your property’s value and lifestyle for years to come. Contact us for expert retaining wall services in San Diego