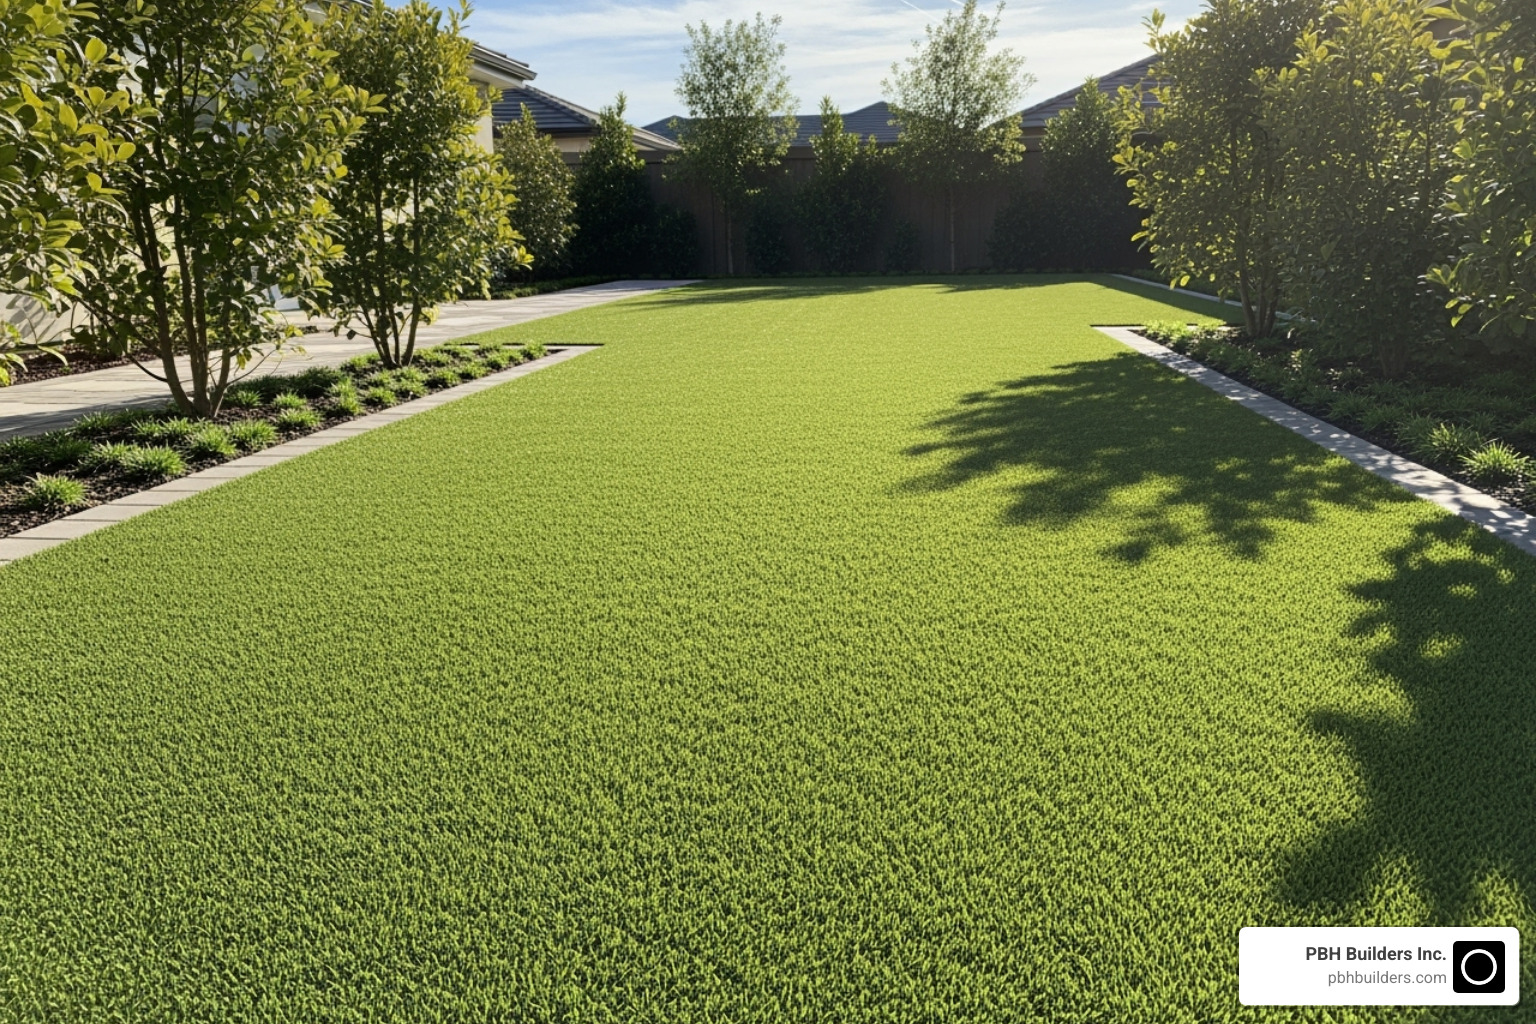
The Foundation of a Flawless Artificial Lawn
Properly nailing artificial grass is critical for a pristine, long-lasting lawn. Without secure anchoring, artificial turf can shift, lift, or wrinkle, ruining its appearance and durability. A well-anchored lawn stays smooth, prevents wrinkles, and withstands foot traffic and weather, ensuring you can enjoy its benefits for years.
To effectively secure artificial grass:
- For soil installations: Use 6-inch (hard soil) to 7-inch (soft soil) galvanized spiral nails every 6-8 inches along the perimeter and seams. Alternatively, use 4-6 inch sod staples for softer ground or intricate edges.
- For concrete or wood surfaces: Adhesives and perimeter fastening are preferred over nails.
- Overall coverage: Aim for one nail or staple per square foot, adjusting for high-traffic or windy areas.
Artificial turf offers San Diego homeowners a beautiful, low-maintenance alternative to natural grass—a vibrant green landscape year-round without endless watering, mowing, or fertilizing. This guide provides expert tips to ensure your new lawn looks stunning and lasts.

Learn more about nailing artificial grass:
Choosing Your Fasteners: Spiral Nails vs. Sod Staples
When nailing artificial grass, choosing the right fastener is crucial. We rely on two main types: spiral nails and sod staples. Both are made from galvanized steel to resist rust and corrosion, but each has strengths for different situations.
Here’s a quick comparison:
| Feature | Spiral Nails | Sod Staples |
|---|---|---|
| Holding Power | Superior resistance to pulling, robust grip | Strong grip, larger surface area |
| Best Soil Type | Harder, compact soil, rocky terrain | Softer, sandy soil, areas with more moisture |
| Primary Use | Large areas, high-traffic zones, perimeters | Edges, corners, securing seams, intricate shapes |
| Cost | Generally higher per fastener | Generally more economical |
| Length | 6-8 inches | 4-6 inches (U-shape) |
| Material | Galvanized steel (rust-resistant) | Galvanized steel (rust-resistant) |
The Power of Spiral Nails
Spiral nails are the heavy-duty choice for artificial grass installation. These 6 to 8-inch fasteners have a twisted, corkscrew design for exceptional holding power. The spiral shape creates resistance against pulling forces, ensuring your turf stays put without shifting, lifting, or wrinkling.
We use spiral nails for hard or compact soil, common in many San Diego areas. A 6-inch nail penetrates hard ground effectively and is less likely to bend. For softer soil, a 7 or 8-inch nail provides a deeper grip.
Spiral nails are ideal for high-traffic areas like play zones and pathways, as well as for securing the perimeter of your lawn. We space them every 6 to 8 inches along edges and seams for a reliable, long-lasting hold.
The Utility of Sod Staples
Sod staples, or U-pins, are versatile fasteners. Their U-shape design has a wider surface area that spreads the holding force, making them effective in certain conditions.
Staples are best for softer or sandy soil, where their wider footprint provides better support than a narrow nail. They are also excellent for securing seams, holding seam tape and turf edges together while adhesive sets.
For edges, corners, and intricate shapes, staples offer a quick and reliable solution. We recommend placing them every 3 to 4 inches along edges for optimal hold. Staples are also more budget-friendly and quicker to install, making them great for finishing touches and complementing the heavy-duty work of spiral nails.
Preparation is Key: Tools and Groundwork
Before nailing artificial grass, proper preparation is essential for a long-lasting lawn. Skipping this step can lead to wrinkles, poor drainage, or shifting turf. A solid foundation is the key to a perfect lawn.

Essential Tools and Materials
Gathering the right equipment makes the job easier. You will need:
- Tools: A sharp utility knife, measuring tape, rubber mallet (preferred over a hammer to prevent damage), safety glasses, work gloves, shovel, rake, wheelbarrow, and a plate compactor or roller for a stable base.
- Materials: Your artificial turf, galvanized spiral nails or sod staples, seam tape, turf adhesive (like TurfTac), sub-base aggregate (crushed rock or Class II Road Base), optional weed barrier fabric, and infill material (silica sand or specialized products like PureZEO Pro).
Preparing the Ground for a Secure Base
A properly prepared base is critical for your turf’s performance and longevity.
- Call 811: Before digging, call this free service to mark underground utilities.
- Excavate: Remove all existing grass, weeds, and roots. Dig down 4 to 6 inches to make room for the base layers. Cap or relocate any old sprinklers.
- Grade for Drainage: Create a slight slope (1-2%) away from buildings to prevent water from pooling under the turf.
- Lay Weed Barrier: If using, lay weed barrier fabric, overlapping sections by at least 6 inches and securing it with landscape anchors.
- Build and Compact Sub-Base: Add a 2 to 4-inch layer of aggregate. Rake it smooth, then use a plate compactor to create a firm, dense base. Lightly watering the aggregate helps it compact better. A well-compacted base prevents sinking and shifting.
- Final Leveling: For an ultra-smooth finish, add a half-inch skim coat of rock dust or leveling sand, then lightly water and compact it.
This foundation ensures a stable, well-draining surface, which is the most important part of installing artificial grass.
Step-by-Step Guide to Nailing Artificial Grass
With the groundwork prepared, you can now lay and secure the artificial grass. This phase requires careful positioning, cutting, and correct techniques for nailing artificial grass to ensure a seamless, durable result.

Laying, Cutting, and Seaming the Turf
First, unroll the artificial grass over the prepared base. Ensure all rolls are laid with the blades facing the same direction for a uniform, natural look. Trim the turf slightly larger than the area, then make relief cuts from the backing side to help it lay flat around corners or posts.
Next, precisely trim the edges to fit snugly against borders or hardscaping, always cutting from the backing side for clean lines. If your rolls have a factory edge without blades (selvedge), trim it off for better seams.
For seaming, align the edges of two turf pieces, keeping the blade direction consistent. Trim off the outer 3-5 tufts from both pieces to create a 1/8″ to 3/8″ gap between the backings. This prevents a visible “mohawk” ridge or valley.
Fold back the turf edges and lay seam tape underneath the join. Apply a thin, consistent coat of turf adhesive to the tape. Carefully bring the two edges together, keeping the fibers out of the glue. Weigh the seam down with boards and infill bags for 45-60 minutes to allow the adhesive to cure. Learn more about the full installation process.
Proper Techniques for Nailing Artificial Grass
Proper nailing is what anchors your installation for the long term.
Start with perimeter nailing to prevent edges from lifting. Use 6-inch galvanized spiral nails (or 7-inch for softer ground) and place one every 6 to 8 inches around the entire perimeter. This density is crucial for keeping everything secure.
To hide the nail heads, gently spread the turf blades to expose the backing, drive the nail through, and then brush the blades back over the head. This makes the fasteners virtually invisible.
Using a mallet, drive each nail flush with the turf backing. Over-driving creates dimples, while under-driving leaves exposed heads that can be a hazard. The goal is firm contact without distorting the surface.
For extra security, drive nails every 6 to 8 inches along each seam line, in addition to the adhesive. For large installations or high-use areas, add fasteners throughout the main body of the turf, aiming for about one nail per square foot. This prevents bubbling or shifting in the center.
These techniques ensure every inch of your artificial grass is firmly anchored, resulting in a stable, smooth, and beautiful surface.
Advanced Anchoring: Different Surfaces and Special Cases
While nailing artificial grass is standard for soil, installations on concrete, wood, or rooftops require different methods. These hard surfaces call for adhesive-based anchoring rather than mechanical fasteners.

Anchoring to Concrete, Wood, or Rooftops
For concrete surfaces, start by thoroughly cleaning the area. Use a self-leveling compound to fix any dips for a flat base. Since concrete doesn’t drain like soil, drill drainage holes (16 mm diameter) in areas prone to puddling and fill them with shingle. Apply heavy-duty turf adhesive along the perimeter and seams, using a weighted roller to ensure maximum contact. Allow the adhesive to cure for 24 hours before use.
For wooden decks, clean the surface and ensure it is completely dry (at least 48 hours) to prevent mold or rot. Use curved S-seams instead of straight cuts to better hide joins. Apply turf adhesive along the perimeter and seams, avoiding nails that could damage the wood.
Rooftop installations require critical attention to drainage. Install a specialized drainage underlay that allows water to flow freely from beneath the turf while also providing cushioning. Secure the entire perimeter with heavy-duty adhesive, ensuring clear drainage paths.
More info about Artificial Grass on Rooftop applications.
Securing Turf Around Play Equipment
Areas around play equipment experience constant movement and require improved anchoring for safety. Standard methods are not sufficient.
Increase anchor density significantly in these high-stress zones to prevent any shifting, lifting, or trip hazards. Use heavy-duty anchors with wider flanges designed for high-stress applications, sometimes inserted at a 45-degree angle for extra resistance against pulling forces.
For equipment like swing sets, you can attach straps from the anchors to the equipment frames, creating an integrated, secure system. Ensure no sharp edges or anchor heads protrude above the turf; they should be covered or concealed deep within the infill.
Regularly inspect play areas to ensure all anchors remain tight, and replace any damaged fasteners immediately. This extra effort in anchoring provides crucial peace of mind and safety.
Common Mistakes When Nailing Artificial Grass (And How to Avoid Them)
Even with careful planning, it’s easy to make mistakes when nailing artificial grass. Knowing what to watch for can help you avoid common pitfalls.
-
Incorrect Spacing: Using too few fasteners (under-nailing) will cause the turf to shift, lift, or wrinkle. Fix: Stick to the recommended spacing of 6-8 inches along the perimeter and seams, with about one fastener per square foot overall.
-
Over-Nailing: Driving fasteners too deep creates visible dimples on the surface, ruining the smooth appearance. Fix: Use a mallet and drive each fastener flush with the backing without distorting the turf.
-
Visible Nail Heads: Exposed fastener heads are a sign of rushed work. Fix: Always spread the turf blades apart before driving a nail, then brush the blades back over the head to conceal it.
-
Damaging the Turf: Using the wrong tools or too much force can tear the backing or crush fibers. Fix: Use a rubber mallet, which distributes force more evenly than a hammer. If you hit resistance in hard soil, try a new spot rather than forcing the nail.
-
Improper Base Compaction: A sub-base that isn’t thoroughly compacted will settle unevenly, creating a bumpy surface. Fix: Use a plate compactor on each layer of aggregate to create a dense, stable foundation.
-
Creating a “Mohawk” at Seams: If turf pieces are too close, the blades bunch up into a noticeable ridge. Too far apart, and you get a visible gap. Fix: Maintain a consistent gap of 1/8″ to 3/8″ between the backing of seamed pieces.
-
Using 90-Degree Seams: Laying turf pieces perpendicular to each other creates an unnatural look due to the way light reflects off the blades. Fix: Always lay all turf rolls with the grain facing the same direction.
-
Installing Over Natural Grass: Never lay artificial turf directly over existing grass or weeds. This leads to poor drainage, weed growth, and an uneven surface. Fix: Always excavate the area and prepare a proper sub-base.
Frequently Asked Questions about Securing Turf
Here are answers to common questions about securing artificial grass.
How many nails do I need for artificial grass?
A good guideline is approximately one fastener per square foot of turf. However, placement is key. Along the perimeter and at every seam, space nails every 6 to 8 inches. For staples along edges, tighten the spacing to every 3 to 4 inches.
Increase this density in high-traffic zones, windy areas, or if you have pets that might dig. It’s always better to use a few extra fasteners to prevent future lifting or wrinkles.
What size nails are best for artificial grass?
The ideal nail size depends on your soil conditions. 6-inch galvanized spiral nails are effective for most standard to hard soil types in San Diego. They are sturdy and penetrate well without bending.
For softer or sandier soil, use 7-inch or 8-inch galvanized spiral nails. The extra length provides a more secure grip in less compact ground. Always choose galvanized fasteners to prevent rust and ensure they last as long as your turf.
Can I use a regular hammer instead of a mallet?
While you can technically use a regular hammer for nailing artificial grass, we strongly recommend a rubber or dead blow mallet. A mallet’s wider, softer head distributes force more evenly, reducing the risk of bending nails or damaging the turf backing.
A hammer’s concentrated force can easily bend a nail if it hits a rock, and an accidental slip can tear or scuff your new turf. If you must use a hammer, place a small piece of wood over the nail head to help distribute the impact and protect the turf. However, a mallet is an inexpensive tool that yields much better results.
Conclusion: The Final Touches for a Flawless Lawn
By properly nailing artificial grass, you’ve set the stage for a gorgeous, low-maintenance lawn. A few final touches will make the installation spectacular.
First, apply the infill. Carefully spread a material like silica sand across the turf. For pet owners, PureZEO Pro is an excellent choice for odor control, while Wonderfill provides superior cushioning. Infill weighs down the turf, helps the blades stand upright, and adds a comfortable layer underfoot.
Next, use a power broom or stiff-bristle broom to work the infill deep into the grass blades. Brush against the grain to help the fibers stand vertically, creating a lush, natural appearance.
Conduct a final inspection, looking for any loose edges, slight wrinkles, or uneven infill spots. These minor adjustments ensure a flawless finish.
Artificial grass, while low-maintenance, benefits from some ongoing care. Regular brushing in high-traffic areas, an occasional rinse to remove dust, and prompt cleaning of spills will maintain your lawn’s beauty and stability for years.
An artificial lawn is an investment in your lifestyle and property value. For San Diego homeowners seeking a professional result without the stress, the team at PBH Builders Inc. is here to help. We specialize in creating captivating outdoor environments, bringing creativity and meticulous attention to detail to every project. We are committed to enhancing your property value and lifestyle.
Ready to transform your yard? Discover more Low Maintenance Landscaping ideas or explore professional Artificial Turf and Pavers Installation in San Diego. Your dream lawn is closer than you think!