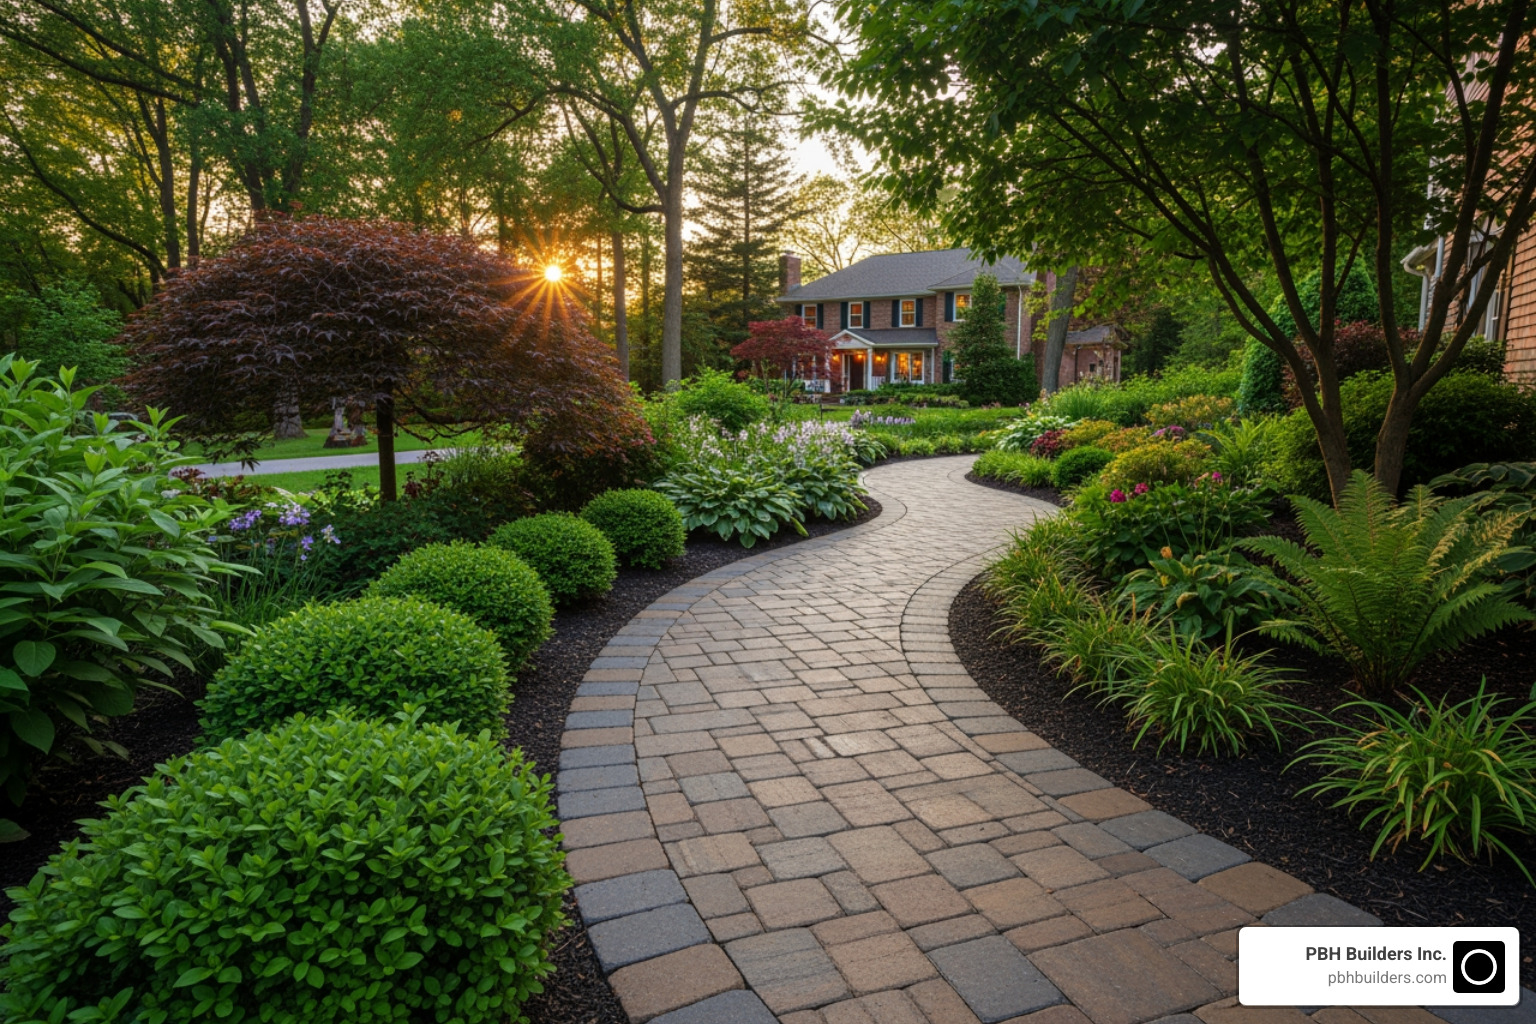
Why Curved Paver Walkways Transform Your Outdoor Space
Curved paver walkways add elegance and natural flow to any landscape. Unlike rigid, straight paths, they create an inviting entrance, guide visitors through your garden with visual interest, and can increase your home’s curb appeal by 5-15%.
Quick Guide to Curved Paver Walkways:
- Design – Plan curves with a garden hose, aim for 36″+ width, and avoid overly tight curves.
- Base – Excavate 7-9″, compact a 4-6″ gravel base in lifts, and add a 1″ sand bed.
- Drainage – Create a 2% slope away from structures (¼” per foot).
- Installation – Lay pavers in a running bond or herringbone pattern and cut curves with a wet saw.
- Edge Restraint – Use flexible plastic edging, spiking every 8-12″.
- Finish – Fill joints with polymeric sand, compact, and activate with water.
Curved paths complement the organic shapes in your landscape, creating a sense of journey that adds sophistication to any San Diego home. The key to a lasting walkway lies in three elements: proper base preparation, honest drainage, and secure edge restraint. Get these right, and your path will withstand traffic, weather, and time without shifting.
This guide covers every step, from planning and material selection to cutting and finishing. Whether you’re a DIY enthusiast or hiring a professional, you’ll learn what makes a curved paver walkway both beautiful and durable.
, Improved Flow (guides visitors gracefully), Enhanced Curb Appeal (increases home value 5-15%), Perceived Space (makes small yards appear larger), with comparison illustrations of curved vs straight paths - curved paver walkways infographic")
Common curved paver walkways vocab:
The Art of Design: Planning Your Perfect Curved Walkway
A well-designed curved paver walkway is more than a path; it’s a journey. In San Diego, these flowing paths complement a home’s landscape, add softness and movement, and can boost property value by 5-15%. A curve turns a simple walk into an experience.
Path Layout Techniques
To plan your curve, use a simple garden hose. Lay it on the ground to visualize the path, adjusting it until the shape feels natural. Once satisfied, mark the outline with spray paint to create a roadmap for your project.
For width, 36 inches is adequate for one person, but 48 inches or more allows two people to walk comfortably side-by-side, creating a more generous feel.
The tightness of the curve is also important. While dramatic, tight curves require many difficult cuts, gentle, sweeping curves look more natural and are easier to build. It’s best to map out a flowing radius and let the paver pattern follow it.
To learn more about creating your ideal outdoor space, see our landscape design process. For current trends, check out these 10 Hardscaping Tips for 2025.

Choosing the Right Materials and Patterns
Your choice of material sets the tone for your curved paver walkways.
- Concrete pavers are a popular choice in San Diego. They are durable, affordable, and available in a wide variety of colors and shapes, delivering consistent results.
- Natural stone, like flagstone, offers a high-end, organic look with unique textures and colors. However, it is more expensive and requires special cutting equipment.
- Brick pavers provide a timeless, classic charm perfect for traditional homes. Their smaller size adapts well to gentle curves, often requiring fewer cuts than larger pavers.
Pro tip: Modular pavers are designed to fit together smoothly, making them ideal for maintaining clean lines on curved paths. Regardless of material, mix pavers from different pallets during installation to avoid color banding and ensure a uniform look.
Pattern selection impacts both aesthetics and installation effort.
- The running bond pattern is a curve-friendly choice, with pavers running parallel to the path, requiring fewer cuts.
- The herringbone pattern offers superior strength and visual interest due to its interlocking 45-degree angle layout, but it requires more cuts on curves.
- A soldier course border, with pavers set on edge along the perimeter, creates a polished, defined frame. It requires cutting pavers into wedge shapes to follow the curve.
Our guide on how to choose and install pavers for your home offers more detailed advice.
Cost Considerations for curved paver walkways
A curved paver walkway in San Diego typically costs between $20 and $50 per square foot, with curves falling on the higher end of that range. The primary cost driver is the labor-intensive cutting required to create smooth curves. Each cut takes time, wears down equipment, and generates waste.
Labor generally accounts for 50-70% of the total project cost. While DIY is an option, curved paths are not beginner-friendly and require specialized tools like a wet saw. Mistakes can be costly.
Material costs also vary, with concrete pavers being more affordable than natural stone. Specialized border pieces or smaller pavers for tight bends can also increase the budget. However, a well-installed curved walkway can increase home value and last 20-30 years or more, making it a worthwhile investment in your property’s curb appeal and functionality.
Step-by-Step Installation: Building Your Curved Paver Walkway
Building a curved paver walkway requires patience and precision, but the results are worth the effort. This step-by-step guide explains the process, whether you’re doing it yourself or hiring a professional.
Step 1: Excavation and Base Preparation
A walkway is only as good as its base. Rushing this step can lead to a wobbly, uneven surface.
Start by excavating 7-9 inches deep for a pedestrian walkway, making the area slightly wider than the final path to accommodate edge restraints. Level and compact the subsoil with a plate compactor for a solid foundation.
Next, lay down geotextile fabric. This is crucial in San Diego’s clay or organic soils, as it prevents the base material from mixing with the soil and improves drainage.
Add 4-6 inches of ¾-inch minus crushed stone or gravel for the base. Apply it in 2-3 inch layers (or “lifts”), compacting each layer thoroughly with a plate compactor before adding the next. This meticulous process ensures a stable base that prevents sinking and shifting, forming the backbone of your curved paver walkway.

Step 2: Ensuring Proper Drainage and Slope
Proper drainage is essential to prevent puddles, erosion, and shifting pavers, especially with San Diego’s occasional heavy rains.
Build in a consistent 2% grade (¼ inch of drop per foot) to direct water away from your home’s foundation and off the walkway. This subtle slope is unnoticeable when walking but crucial for water management.
Work with your yard’s existing slope. For steeper areas, you can incorporate steps. Pro tip: When laying pavers on a downhill slope, tap each paver gently upward into place to prevent sliding during installation.
For properties with significant runoff, French drains may be necessary. Ensure at least 4 inches of compacted base is maintained above any drain pipe a walkway crosses, with 6-12 inches of base between the walkway edge and drain trenches to prevent uneven settling. A well-drained walkway will remain dry, safe, and stable for years. For professional help, see our San Diego paver installers services.
Step 3: Screeding the Sand and Laying the Pavers
The bedding layer is where the pavers sit. Spread a 1-inch layer of moist, washed concrete sand over the compacted base. Use concrete sand, not mason sand, as its lack of fine particles improves drainage and reduces the risk of efflorescence (white, powdery stains).
To level the sand, use screed rails and a screed board. Pull the board across the rails from the highest point downhill to create a smooth surface. Carefully fill any voids by hand.
Begin laying pavers from a fixed point, like a building or the inside of the curve, and work outward. Use the click-and-drop method: place each paver gently onto the sand bed and tap it with a rubber mallet to set it. A running bond pattern is ideal for curved paver walkways as it follows the curve naturally with fewer cuts. Periodically check your alignment as you work. For a visual guide, check out these secrets for laying out a curve.
Step 4: Cutting Curves and Installing Edge Restraints
Precision is key when cutting the curve. After laying the full pavers, use a flexible guide like a PVC conduit to mark the curve with chalk. Numbering pavers before cutting helps with reassembly.
A wet saw with a diamond blade is the right tool for cutting. For clean cuts on tight curves, you can score the lines with a demo saw first. Keeping the blade wet reduces dust and improves safety. After cutting, slightly bevel the edges for a professional finish, ensuring the factory edge faces out.
Flexible plastic edge restraint is ideal for curved paver walkways. Install it on the compacted base, not topsoil, for stability. For tighter curves, cut the plastic’s support ribs to help it bend. Spike the restraint every 8-12 inches, increasing frequency on curves to hold the shape. Once installed, cover the edging with soil or sand to protect it from sun damage.

Step 5: Applying Joint Sand and Final Compaction
The final steps lock your pavers in place. Spread polymeric sand over the surface. Its water-activated polymers create a strong bond that locks pavers, prevents weeds, and deters insects.
Use a stiff broom to sweep the sand into every joint until completely full. This is critical for preventing paver shifting.
Next, run a plate compactor with a protective mat over the walkway 2-3 times. The vibration settles the sand deep into the joints without damaging the pavers.
Use a leaf blower on a low setting to remove excess sand from the paver surfaces to prevent a polymer haze from forming.
Finally, lightly mist the walkway with water to activate the polymers. Avoid a heavy spray, which can wash the sand out. The sand needs 12-24 hours to cure without rain, so check the manufacturer’s instructions and be patient. This final step ensures your curved paver walkway is secure and durable.
Maintenance and Overcoming Common Challenges
A properly installed curved paver walkway is a long-term investment. With a little routine care, it will continue to look beautiful and function perfectly for decades.
How to Maintain Your curved paver walkways
Maintaining your curved paver walkway is simple and ensures it remains stunning for years.
- Regular Sweeping: Sweep weekly to remove debris and prevent buildup.
- Weed Prevention: Polymeric sand deters most weeds, but pull any that appear or use a spot treatment.
- Joint Sand Maintenance: If joint sand erodes after heavy rain or washing, sweep fresh polymeric sand into the gaps to keep pavers secure.
- Sealing: Seal your pavers every 2-3 years. This protects against stains and UV damage in San Diego’s climate, improves color, and simplifies cleaning.
- Spot Cleaning: Address stains like oil or rust quickly. Use appropriate cleaners for the specific type of stain.
Perform seasonal checks: in spring, inspect for settling and replenish sand. In summer and fall, stay on top of weeds and stains from leaves or spills. In winter, ensure drainage is functioning correctly.
Troubleshooting Common Installation Issues
Even well-installed walkways can face issues. Here’s how to troubleshoot common problems.
- Uneven Pavers: Rocking or sunken pavers usually indicate a problem with the base. An improperly compacted base or uneven sand bed can cause settling. For small fixes, you can lift the pavers, adjust the sand, and re-lay them.
- Wide Gaps in Curves: On tight curves, gaps may appear on the outer edge. With smaller pavers, these can be filled with polymeric sand. For cut designs, this indicates a need for more precise cutting. You may need to re-cut pavers for a tighter fit.
- Paver Shifting: This is often caused by failed edge restraints or a poor base. Ensure restraints are securely spiked into the compacted base, especially on curves where outward pressure is highest.
- Poor Drainage: Lingering puddles suggest an incorrect slope or base issue. Verify the 2% grade (¼ inch per foot). If the slope is correct, the base may be too dense or the underlying soil may not be draining, potentially requiring a French drain.
- Efflorescence: This natural, white, powdery stain on new pavers is caused by salts migrating to the surface. It typically fades over time with rain but can be removed with a specialized cleaner. Using concrete sand and proper base materials helps minimize it.
Most of these issues are preventable with correct installation, highlighting the importance of a solid foundation, proper drainage, and quality materials for a long-lasting curved paver walkway.
Frequently Asked Questions about Curved Paver Walkways
Homeowners often have questions about the design and installation of curved paver walkways. Here are answers to the most common ones.
What is the best paver pattern for a curved walkway?
The best pattern depends on your aesthetic goals and the tightness of the curve.
- Herringbone: Offers maximum stability due to its interlocking design, making it highly resistant to shifting. It’s ideal for high-traffic areas but requires more cuts on curves.
- Running Bond: This is the easiest pattern for curves, as pavers run parallel to the path, minimizing cuts. It follows gentle curves naturally and provides a clean look.
- Soldier Course Border: While not a field pattern, laying pavers end-to-end along the edges adds a defined, professional finish and structural stability. It requires cutting border pavers into wedges to follow the curve.
Should a front walkway be straight or curved?
The choice between a straight or curved front walkway depends on your home’s style and desired effect.
- Curved walkways create a natural, welcoming journey to your front door. They soften a home’s architecture, can make small yards feel larger, and complement the organic feel of many San Diego landscapes.
- Straight walkways offer formality and a direct route. They are typically faster and less expensive to install and work well with symmetrical, traditional, or minimalist designs.
The decision depends on whether you prefer a direct, formal approach or a more leisurely, scenic one.
How do you make a curved paver walkway without cutting?
Creating a smooth curve without cutting is challenging, but it can be done, especially for more informal paths.
- Use Smaller Pavers: Bricks and other small pavers can form a curve more gradually, making the angle between each paver less noticeable.
- Choose Tumbled Pavers: The irregular, soft edges of tumbled pavers help disguise the uneven joint widths that occur on a curve.
- Use Specialized Patterns: Some manufacturers offer fan or radial paver kits designed specifically for curves, requiring minimal to no cutting.
- Accept Wider Joints: For a casual garden path, you can lay rectangular pavers and accept the wider joints that form on the outside of the curve. Fill these gaps with polymeric sand or decorative gravel for a finished look.
However, for a formal entrance or a highly polished look, we recommend cutting the pavers to achieve clean, tight lines.
Transform Your Landscape with a Custom Walkway
We’ve covered the key steps to creating a beautiful and durable curved paver walkway, from design and base preparation to cutting and finishing. A curved path does more than connect two points; it creates a natural flow, improves your landscape, and can increase your home’s value by 5-15%—a fantastic investment in San Diego’s outdoor-oriented lifestyle.
The difference between a temporary fix and a decades-long feature lies in proper installation. A solid base, smart drainage, and secure edge restraints are the non-negotiable elements that ensure a professional, lasting result.
At PBH Builders Inc., we specialize in creating custom outdoor spaces that are a natural extension of your home. Our team combines technical expertise with creative vision, understanding San Diego’s unique landscape challenges and opportunities. We work with you to select the right materials and design a curved paver walkway that reflects your property’s unique character, whether you prefer classic brick, natural stone, or modern concrete.
We don’t do cookie-cutter solutions. Every project is custom to your vision. Ready to transform your landscape with a walkway built with creativity and craftsmanship? Explore our paver projects for more inspiration and let’s create something beautiful together.