Transform Your Outdoor Space with a Professional Pergola Installation Guide
A pergola installation guide can help you create the perfect outdoor retreat in your San Diego backyard. A pergola adds shade, defines an outdoor living area, and increases property value, making it a rewarding home improvement project.
Quick Pergola Installation Overview:
- Planning: Choose materials, measure the space, and check local codes.
- Site Prep: Clear the area, mark post locations, and gather tools.
- Foundation: Dig holes and set posts in concrete or use brackets.
- Frame: Install beams and rafters with proper fasteners.
- Roof: Add slats, louvers, or your chosen roof system.
- Finishing: Secure all connections and add accessories.
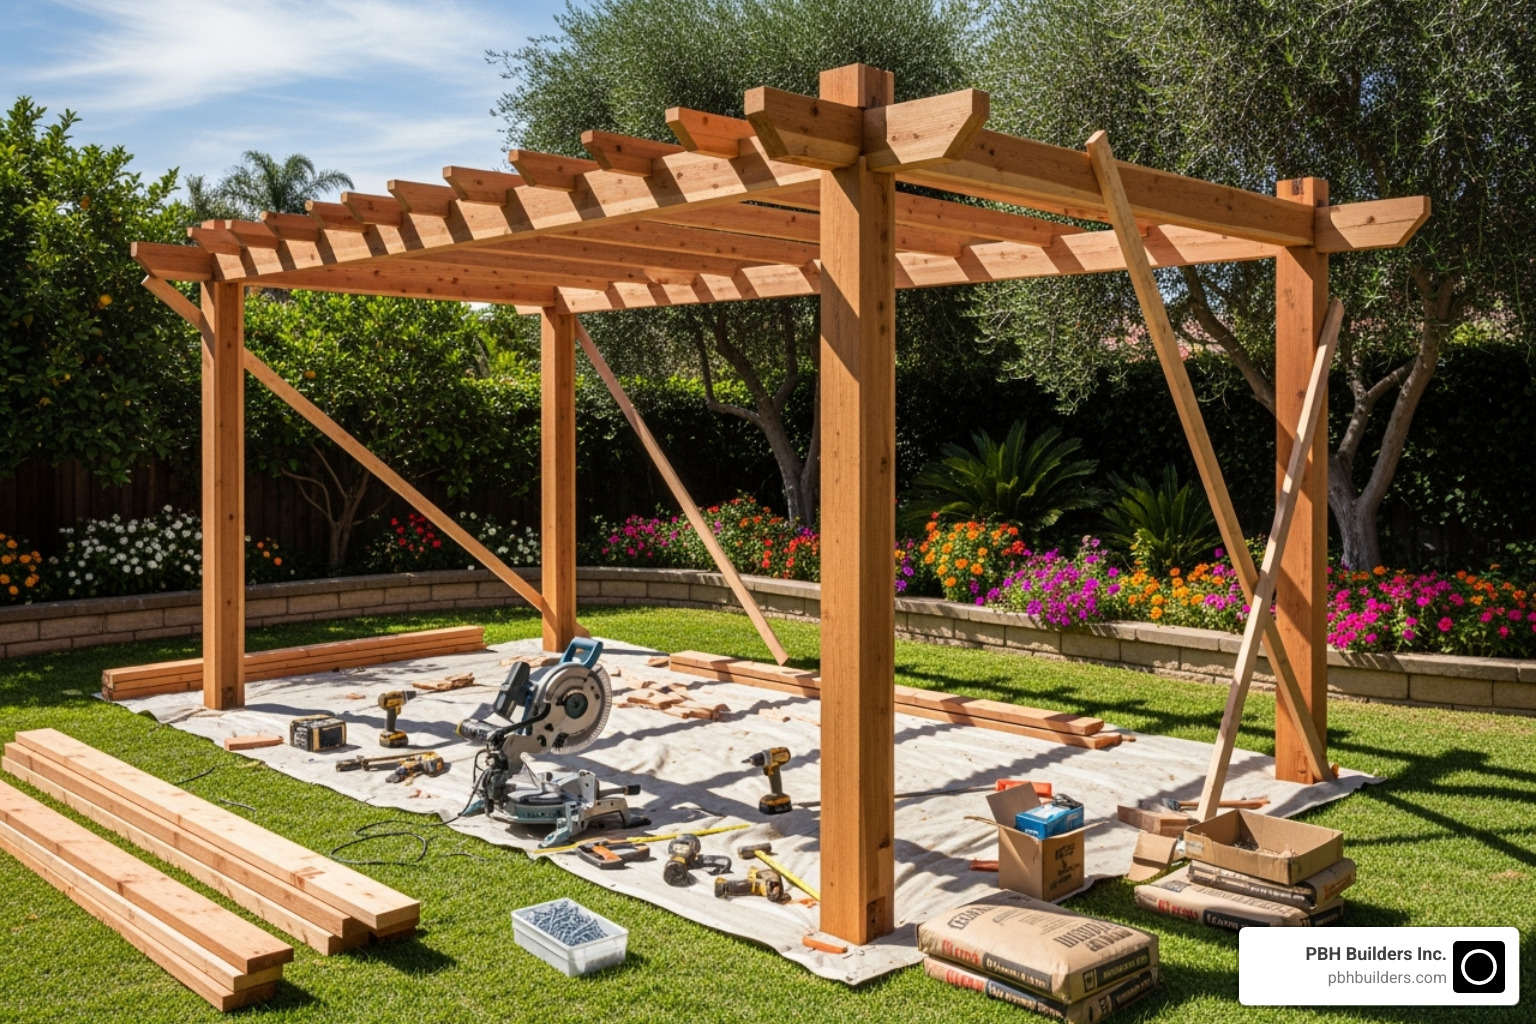
Building a pergola is an achievable project that can often be completed in a couple of days. The material cost for a basic 10×14 ft wood pergola was around $750 in 2019, making it an affordable upgrade. Modern aluminum pergola kits have streamlined DIY installation, with some able to be assembled in as little as 4 hours, while a traditional wood build can take 20+ hours. Due to the size and weight of the components, a minimum of three healthy adults are recommended for a safe installation.
Your new pergola will provide filtered sunlight, create a defined outdoor room, and serve as a beautiful foundation for entertaining or relaxing in your backyard oasis.
 Provides shade and UV protection for outdoor activities, 2) Creates defined outdoor living spaces and rooms, 3) Increases property value and curb appeal, 4) Offers support structure for climbing plants and string lights, 5) Extends usable outdoor space for year-round entertaining in San Diego's climate - Pergola installation guide infographic")
Planning Your Perfect Pergola: From Vision to Foundation
This pergola installation guide is your roadmap to creating the perfect outdoor sanctuary. The planning phase is where you make the key decisions that ensure your project’s success. Great planning is what separates a weekend project from truly Beautiful Outdoor Spaces.
Choosing the Right Materials and Style
Your material choice impacts your pergola’s appearance, durability, and maintenance needs.
-
Wood pergolas offer a classic, natural warmth. Pressure-treated pine is a budget-friendly option (a 10×14 ft pergola costs around $750 in materials) treated to resist rot and insects. Cedar is a premium choice with a beautiful grain and natural resistance to rot and bugs. Wood requires regular staining and sealing to protect it from the elements.
-
Aluminum pergolas are modern, durable, and low-maintenance. They resist rust, rot, and insects and can handle high winds. Many come with features like adjustable louvered roofs and integrated drainage. The main drawbacks are a higher upfront cost and a modern aesthetic that may not suit all homes.
-
Vinyl pergolas are another affordable, low-maintenance option, but they offer fewer color choices and may feel less substantial than wood or aluminum.
When choosing a style, consider your home’s architecture. A rustic cedar pergola suits a craftsman home, while a sleek aluminum design complements a modern one.
Sizing and Siting Your Pergola
Properly sizing and placing your pergola is crucial for both function and aesthetics.
Start by measuring your available space, ensuring you leave clear pathways for traffic flow. While an 8×8 ft pergola can work for small areas, a 10×13 or 10×14 ft structure provides more room for furniture and entertaining.
Observe your yard’s sun patterns to determine the best placement for shade. Running the main beams north-to-south often provides more consistent sun protection than an east-to-west orientation.
Decide on proximity to your house. A freestanding pergola can be a stunning garden focal point; place it at least 6-8 feet from your house for airflow and maintenance access. An attached pergola creates a seamless indoor-outdoor transition but requires secure anchoring to your home’s frame.
Height matters for comfort. Aim for at least 7 feet of clearance underneath to keep the space feeling open and inviting.
Before you break ground, contact your local San Diego building department about permits and setback requirements. For safety, it is non-negotiable to check for underground utilities before you dig. This free call can prevent a costly and dangerous mistake. Finally, create a detailed budget that includes materials, tools, concrete, hardware, and finishing touches like stain or paint.
Gearing Up: Your Complete Pergola Installation Guide to Site Prep & Safety
With your plan complete, it’s time to gather your tools and prepare the site. Proper preparation is key to a smooth pergola installation guide project.

Essential Tools and Supplies Checklist
Having everything on hand before you begin will save you time and frustration. Here’s a checklist of what you’ll need:
- Measuring & Marking: Tape measure, 4-foot level, chalk line, framing square, pencil, permanent marker.
- Cutting: Circular saw, jigsaw (for decorative cuts), reciprocating saw, box cutter.
- Drilling & Fastening: Power drill, impact driver, hammer drill (for concrete), drill bit set, wrench or socket set, hammer.
- Assembly & Support: Two step ladders (at least 5 ft tall), saw horses, hand clamps, mallet.
- Supplies: Ornamental post anchors (for concrete surfaces) or concrete mix (for in-ground posts), structural screws, gravel for drainage, exterior-rated glue, silicone sealant, touch-up paint, and temporary bracing lumber (e.g., 2x4s).
Preparing the Site for a Pergola Installation
Site preparation sets the stage for a stable and level structure.
First, clear and level the area where the pergola will stand. Remove all vegetation, rocks, and debris. If you’re building on an existing patio, ensure it is structurally sound.
Next, mark the post locations with precision. Use stakes and string lines to outline the pergola’s perimeter. To ensure your corners are perfectly square, use the 3-4-5 method: measure 3 feet along one line and 4 feet along the adjacent line. The diagonal distance between those two points should be exactly 5 feet.
If you’re building on a concrete patio, it likely has a slight slope for drainage. Account for this by measuring the height difference at each post location from a level reference point. This will allow you to cut your posts to slightly different lengths so the top of the pergola is perfectly level.
Finally, always watch local weather forecasts and plan your work for clear days.
Critical Safety Precautions for a DIY Pergola Installation
Safety is paramount. Do not cut corners when it comes to protecting yourself and your helpers.
- Personal Protective Equipment (PPE): Always wear safety glasses, sturdy work gloves, and closed-toe shoes. Use hearing protection with power tools and a dust mask when cutting wood or mixing concrete.
- Ladder Safety: Place ladders on stable, level ground. Never overreach; it’s safer to move the ladder. Having a spotter is always a good idea.
- Heavy Lifting: Pergola components are heavy. A minimum of three healthy adults is recommended for safely moving and installing beams and posts. Do not attempt to lift heavy pieces alone.
- Power Tool Handling: Read your tool manuals and keep all safety guards in place. Use sharp blades, as dull ones are more dangerous. Disconnect power when changing blades or bits.
- Electrical Safety: Be aware of any electrical lines. If you plan to add lighting, be mindful of hazards. Never drill or dig where you suspect underground utilities might be present.
The Build: Step-by-Step Pergola Assembly
This is where your planning pays off as the pergola takes shape. We’ll walk you through each step, from setting the posts to installing the roof.

Setting a Strong Foundation: How to Secure Pergola Posts
A solid foundation is crucial for your pergola installation guide success. Your posts must be plumb (perfectly vertical) and level.
-
For In-Ground Posts: Dig holes at each marked location, typically 28-48 inches deep (check local codes) and about 8×8 inches wide. Add 4-6 inches of gravel at the bottom for drainage. Place a post in each hole, using a level to ensure it is plumb. Brace the post with 2x4s, then fill the hole with concrete, stopping a few inches from the top. Let the concrete cure for at least 24 hours before removing the braces.
-
For Existing Patios: Use metal post bases secured to the concrete with heavy-duty anchors. This method keeps the wood post off the concrete, reducing the risk of rot. You’ll need a hammer drill to create holes for the anchors. Once the base is secured, the post bolts directly into it.
Throughout this process, constantly check that posts are plumb and that the tops align with each other. Keep temporary braces in place until the frame is fully assembled and stable.
Constructing the Frame: Attaching Beams and Rafters
With the posts secure, it’s time to build the horizontal framework.
Lifting and Securing Main Beams is a team effort requiring at least three people. Lift the beams into position on top of or alongside the posts. Use a framing square to ensure 90-degree angles and measure the diagonals between opposite corners to confirm the frame is square—the measurements should match.
Notching Techniques create strong, professional-looking joints. A common method is a half-lap notch, where you cut away half the thickness from two overlapping pieces (like a beam and a rafter) so they sit flush. Use a circular saw for the initial cuts and a chisel to clean them out.
Fasten all connections with high-quality structural screws designed for outdoor use. Pre-drilling holes is recommended to prevent the wood from splitting.
Attach the rafters (e.g., 2x6s) across the main beams, spacing them about 12 inches apart for good shade. You can add purlins (e.g., 2x4s) perpendicular to the rafters for more shade and structural support.
Installing the Roof System and Louvers
The roof system provides the desired shade and weather protection.
-
Traditional Roof Slats: For a classic look, attach 1×2 slats across the rafters, spaced about 12 inches apart. Secure them with galvanized nails or exterior-grade screws.
-
Adjustable Louver Systems: Modern pergola kits often feature adjustable louvers that allow you to control sunlight and ventilation. Installation typically involves attaching hardware to each louver and then mounting them to the frame. This can be a tedious process, so be patient. A helper is recommended to support the louvers during installation. Many of these systems include integrated drainage that channels rainwater away through the posts.
Once installed, test all moving parts. Open and close the louvers several times to ensure they operate smoothly and align correctly. Test the drainage system if applicable before considering the project complete.
Finishing Touches & Long-Term Care
With the main structure built, it’s time to personalize your pergola and learn how to maintain it for years of enjoyment. A good pergola installation guide includes planning for long-term preservation.

Customizing Your Pergola
Transform your pergola from a structure into a personalized oasis with accessories:
- Shade and Privacy: Add shade screens or retractable shades for extra sun protection and privacy.
- Lighting: String lights create a warm ambiance, while post sconces offer practical pathway lighting. Hanging decorative lanterns can add a touch of elegance.
- Plants: Train climbing vines like jasmine or bougainvillea up the posts for natural beauty and shade. Hanging planters add color at eye level.
- Furniture: Arrange comfortable seating around a central point, like creating an outdoor room with a coffee table, to encourage conversation and relaxation.
For a fully integrated design, consider how your pergola works with the surrounding landscape. The experts at PBH Builders Inc. specialize in creating cohesive Outdoor Living Spaces.
Pergola Maintenance for Lasting Beauty
Regular care will keep your pergola looking great and functioning properly.
- Regular Cleaning: Every few months, wash your pergola to remove dirt and debris. For aluminum, use warm water and a mild, non-abrasive detergent. For wood, use mild soap and water.
- Hardware Inspection: Periodically check and tighten all bolts, screws, and fasteners, as they can loosen over time due to weather changes and use.
- Wood Protection: Reapply stain or sealant to wood pergolas every few years to protect them from sun and moisture, especially in the harsh San Diego climate.
- Address Problems Early: Fix small issues like a loose bolt or peeling stain immediately to prevent them from becoming major problems. For issues beyond your comfort level, consider professional help for Pergola Repair San Diego.
Overcoming Common Installation Challenges
Even with careful planning, you may encounter challenges. Here’s how to handle them:
- Uneven Ground: Use concrete piers with adjustable post fasteners or pour a concrete slab to create a level foundation.
- Out-of-Square Measurements: If your frame isn’t square, re-measure carefully. A small adjustment to a post or beam can often correct the alignment.
- Unexpected Weather: Watch the forecast and protect your materials. Cover lumber if rain is expected to prevent warping, and avoid assembly during high winds for safety.
Frequently Asked Questions about Pergola Installation
Before starting a pergola installation guide project, it’s natural to have questions about the process, costs, and legal requirements. Here are answers to the most common concerns.
Should I DIY or Hire a Professional for Pergola Installation?
The right choice depends on your budget, skills, and available time.
-
DIY Installation: This can be a rewarding and cost-effective option. Material costs for a 10×14 ft wood pergola were around $750 in 2019. Modern aluminum kits have made DIY even more accessible, with some taking only a few hours to assemble. However, DIY requires time (a wood build can take 20+ hours), the right tools, and skill. There are also safety concerns, as lifting heavy components requires at least three adults.
-
Professional Installation: Hiring a professional offers peace of mind, expertise, and efficiency. Experienced crews can complete an installation in 10-16 hours over a few days, handle complex designs, and provide warranties. The main trade-offs are higher overall costs due to labor and potential lead times of up to 8 weeks during peak seasons. For complex projects or a guaranteed flawless finish, hiring a pro is often the best choice.
How Much Does It Cost to Install a Pergola?
Pergola costs vary widely based on several factors.
-
DIY Material Costs: A basic wood pergola can start around $750 in materials, while high-end aluminum louvered kits will cost significantly more.
-
Professional Installation Costs: A professionally installed pergola typically ranges from $1,500 to $6,000+, with an average project around $4,000. Key factors influencing the final price include:
- Size: Larger pergolas require more materials and labor.
- Materials: Premium aluminum or composite materials cost more than standard wood.
- Design Complexity: Custom notching, motorized louvers, and other intricate details add to the cost.
- Site Conditions: Difficult site access or extensive foundation work will increase the price.
Do I Need a Permit to Build a Pergola in San Diego?
This is a critical question. The short answer is: it depends, but you must always check with your local building department first.
Permit requirements in San Diego County vary by municipality. Permits are often required if your pergola exceeds a certain size (sometimes as small as 120 sq. ft.), exceeds a height limit (often 10-12 ft.), or is attached to your house. Significant foundation work, like pouring concrete footers, can also trigger a permit requirement.
Failing to obtain a necessary permit can result in fines, a mandate to remove the structure, and problems when selling your home. A quick call to your local planning office is a crucial step that can save you from major headaches. The permitting process ensures your pergola meets local safety and zoning codes, protecting your investment.
Conclusion
We’ve journeyed through this pergola installation guide together, from initial vision to the final, personalized touches. You now have the knowledge to transform your San Diego backyard into a beautiful and functional outdoor retreat.
Completing a pergola project brings an incredible sense of accomplishment. You’re not just building a structure; you’re creating a space for making memories. A successful installation hinges on thoughtful planning, a commitment to safety, and attention to detail, resulting in a pergola that will serve you for years to come.
Of course, we understand that not everyone has the time, tools, or desire for such a project. If you prefer to leave the work to experts who live and breathe outdoor construction, PBH Builders Inc. is here to help.
We’ve helped countless San Diego homeowners create stunning outdoor spaces. We bring the same passion for beautiful design that inspired you to read this guide, combined with the professional expertise to ensure your pergola is everything you dreamed of. Ready to turn your vision into reality?
Explore our Pergola & Patio Construction services to get started. We’re here to help build your dream backyard.